

Retribution Film Experience
The first step in the “Retribution” project was a team brainstorm to discuss the story.
The team recognised the different types of departments that are involved in accomplishing the project: Dialogue, Foley, Backgrounds, Sound Effects (Hard Sound Effects) and Music. Furthermore, the tasks were split individually between the four-team members. Due to the fact that the most time consuming phase was finding and synchronizing the dialogue with the video, the team decided that each individual member should work on a specific part of the scene. Moreover, all team members wished to get involved in every phase of the assignment (instead of each being assigned to one phase only) in order to get a more holistic view on the processes. Although there were no issues in this respect, reflecting back, it might be safer to separate the roles as the industry standard imposes, which is by departments, as this would increase the consistency between departments in terms of editing and the sonic coherency.
Film Departments
Discussing the story
Adding Markers
Organising the Dialogue
After establishing the primary roles of sound in film, which are as follows: direct narrative role, dialogue, voice-over, sound effects and backgrounds, the team went further and discussed again the story in this session. Moreover, we placed markers within the session for an easier management of the audio and placement of the clips.
Additionally, the takes were arranged in separate folders, which were named according to the contained dialogue. This was a time saving technique that improved the workflow for a later stage where the audio had to be imported and synchronized with the video within the Pro Tools session.
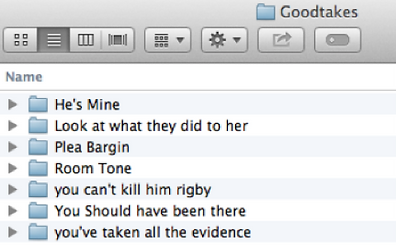
Day 8 Folder Layout
Dialogue Sessions
Dialogue Session 1
In this session, the team followed a plan, which involved going through the audio files while working with the audio reports as a guide. Additionally, each individual member booked a post-production suite. This is when the team picked the established folders that contained the audio files, imported the fitted parts into the session and synchronized these with the video.
The Dialogue Editing phase begun and encompassed the following techniques: using fades (this was done by overlapping audio from contiguous shots within the scene and adding small fades between the overlaps), splitting the tracks (the audio regions of each shot occupied alternating tracks), grouping the audio logically/ by the means it was recorded (a boom was used for each actor individually, that means the microphone would point at each actor directly, but at opposing angles in the environment for the differing shots; so we placed each boom on its own track).
At the end of the day, the team put the work together in one session and analysed the progress while planning a “to do list” for the next time. In order to keep the progress going, the team members chose to send stems constantly on an online Facebook group and informed the team in case they were not available to join the meetings. This workflow technique was adopted in order to finish the assignment in time and for that it was required to ensure a constant and controlled progress of the project.
Diegetic & Non-Diegetic
In this session, the Dialogue Editing phase carried on. Part of the process, the team also discussed the distinction between Diegetic and Non-Diegetic Sound that is present (or might be present in the case of Non-Diegetic Sound) in our assignment.
The Diegetic Sound (actual sound) is the sound that is detectable on the screen or whose source is implied to be present by the action of the film, i.e. voices of characters, sounds made by objects in the story, music represented as coming from instruments in the story space (Myer, 2011). The latter example was not applicable in our case, as the scene that we worked on did not have any source of music in the story world. The music is present in our assignment though, under the form of mood music, which is part of Non-Diegetic Sound. This category is represented as coming from a source outside the story space, i.e. narrator’s commentary, sound effects which are added on top of the direct sound for the dramatic effect (post synchronization dubbing) and the previous mentioned one, mood music.
Dialogue Session 2
Due to the fact that the scene we worked on has a length of 15 minutes, the Dialogue Editing process took a few weeks. The difficult part here was finding the right takes, sometimes for each sentence, group of words or even one single word that was pronounced by the character at a certain tonality.
The team edited the Dialogue at first and then equalised (EQ) it in order to fit better in the mix. We also established a smooth flow of the room tone throughout the scene and removed excess ambient sound to eliminate imbalances between the takes.
In today session, we listened to the entire scene in D-Control and realised that some parts are not fitted in because they have undesirable background noise, or inconsistent microphone sources, or distortion, or too much/little reverb or the take did not have the right pitch, timbre or pronunciation, as the actor on the screen. We made a plan with things to be done by the next meeting, which included the following: going again through the audio files and replacing the unwanted clips as well as finding new strategies in cleaning up the Dialogue.
Automated Replacement Dialogue (ADR)
During this session, the group replaced the unwanted Dialogue from production with Automated Dialogue Replacement (ADR).
The ADR is useful in a case where the dialog cannot be recovered from production tracks and has to be re-recorded in the studio (Alten, 2013). This is done by the actor, watching the image repeatedly while listening to the original production track on headphones as a guide. The actor then re-performs each line to match the wording and lip movements.
In our case, the production sound had a lot of reverb on it and sounded “dirty”, so we decided to take Michael Semanick’s advice into account, who states: “Don’t be afraid to make mistakes and try new ideas out. That is the concept of creative creation.” Bearing that in mind, we chose at first to have the Dialogue as flat as possible in order to add the desired reverb afterwards. The team added new tracks to the session in order to place the weak audio files to be affected on their own tracks. The team then explored different techniques of denoising, declipping, dereverbing the audio with the Izotope RX 4 in order to clean it up. This was the crucial moment of the assignment where some issues appeared, but you never know unless you try.
Dialogue Session 3
We went through the cleaning up Dialogue process for 2 weeks, then we put everything in one session and realised that the Dialogue sounded weird due to the overuse of the Izotope RX 4.
We always back up the work so were able to go back and redo the work from a specific point, approaching it differently (that was the moment when I felt really thankful to my tutor, who always says: “Back up your work all the time!”). This was the evidence that proves the fact that we should have split the tasks by departments from the beginning.
However, despite this unsuccessful trial, I learned how to use Izotope RX 4 better and I improved my knowledge on the frequencies spectrum.
Dialogue Session 4 & Spotting Session
The plan was to use as less ADR as possible in order to keep the original acoustic characteristics from the production. In this session, we imported new takes in the most recent backup of the project and replaced most of the ADR. In addition, we experimented with Oxford Reverb on the remained ADR tracks and reached a similar sound with the one from the production.
Also, we created a new Spotting Session and discussed the Sound Effects (FX) that have to be recorded in order to enhance the story and the viewer experience. A list with the sounds from the video was done as well as a list with things that can be used in order to produce those sounds. Moreover, blank audio regions were created in order to simplify the workflow while recording the Foley.
Foley Sessions
In this session, we recorded Foley using a Neumann U87 and a Neumann KM184.
Foley refers to recording footsteps, clothes movements and specifics and is named by a sound editor at Universal Studios, Jack Foley (LoBrutto, 1994). Foleying is an excellent means of supplying the subtle sounds that production mikes often miss. For example, the rustling of clothing and a squeak of a saddle when a rider mounts his horse give a scene a touch of realism that is difficult to provide using other effects methods.
We recorded Foley from 2 different distances to give more options during the post-production phase. However, even though we edited and equalized the recordings, the sound did not match the screen so we had to redo it differently. As a result, new items were selected for the next booked session, which was in the SSL studio.
Foley Session 1
Foley Session 2
Today, the team chose the same microphones as in the previous session, a small diaphragm condenser and a large diaphragm condenser in order to experiment with them and give more options.
The group recorded single takes at different variations of a certain sound. Even though this made the progression more time consuming as the sounds had to be synchronized with the picture afterwards, some of the sounds had the desired acoustic characteristics. However, due to the environment we recorded in (SSL studio), the sound of the footsteps had to be re-recorded later on a concrete surface in order to match the picture.
The items and microphones used for the Foley session (the orange and the aubergine were used for punches)

A Conversation with the Director
I had a conversation with Richard Hellawell today, who is the director of the “Retribution” film, in order to learn more information about his vision in regards to the film. Thus, the approach of the premise has to be realistic, with a stylised and hyper-realistic feel to the sound, aiming to a sonic identity for each character. As the story has already been identified, the role of the sound is now to compliment the images and help tell the story.
Sound Effects (Hard Effects)
In this session, we used samples to create sound effects for the credits part. This was done in Logic Pro X and then modified in Pro Tools, as shown below.
Moreover, different samples were layered up with the sound from the orange and aubergine in order to create the shotguns sound. Also, a Subharmonic Generator was used in order to add weight to the punches. The group experimented with some Backgrounds Effects but we wanted to make the audience focus on the action so we took them off.
Soundtrack - Characters, Emotions
At the beginning of the scene we used mental vocalization, automating the reverb and delay and bringing the audience in Rigby’s head.
After a team discussion, we did the soundtrack today. The group decided to bring in from the beginning of the scene mystery and negative associations about the actions Rigby might take and then attempt to make the audience not to want to kill Viktor. This decision was taken in order to emphasise the storytelling and aimed to make the ending more impacting. Within the scuffle part, we wanted to emphasise Rigby’s anger, so we exaggerated the sound during the strangulation in order to introduce the audience to Rigby’s mental state. The audience is thrown back to reality after Rigby finishes killing Johnny.
The soundtrack sets the mood of the scene and affects the audience at a conscious as well as unconscious level, touching the primary emotions (fear, anger, sadness in our scene) and the secondary emotions (which give a picture of the person’s mental processing of the primary emotions).
Syncronizing the Soundtracks with the Picture by using Elastic Audio
End of the Scene

Pre-Mixing
Final-Mixing
The team started pre-mixing the Retribution film today and used automation and global sends (automation was our key in making something dynamic and full of live). We also took into account the sound perspective, which is the distance from a sound source, evidenced by its volume, timbre and pitch and balanced the tracks as such (Kernisky, 1984).
The EQ on Dialogue was done separately for different audio clips, with Audio Suite, mostly because we also used ADR and it needed to sound similar to the production sound. The other EQ technique used was creating multiple tracks with the 500Hz-5kHz EQ plug-in on each, as the broadcast standard imposes (we cut off less than 300 Hz and above 6 kHz because that fitted the best in our mix space) and then boost or pull down some frequencies where needed. This was a new challenge, which required trained ears, but practice makes it perfect here and this improved my knowledge of the frequencies spectrum.
Session 1
Session 2
The team rebalanced the volume today, refining the mix of the dialogue, sound effects (i.e. Foley, hard effects) and music. This was done separately for each previous mentioned category and then all together in the mix. Also, we automated the reverb on certain clips to create a smooth transition between the shots and keep the continuity on.
We added more low end to Rigby’s footsteps in order to add weight and enhance his emotional state. We also boosted the knife sound around 5 kHz and the high frequencies in order to obtain a more obvious metallic sound.
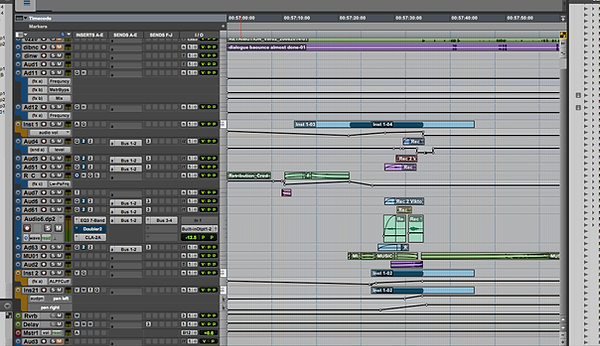
The entire session was bounced down in a few Print Tracks, as shown below, in order to reduce the amount of tracks that we have to work with and refining the entire session.

Pre-Mix Session
Other things I learnt during
the Mixing for Picture Module
Pre-Dubbing towards The Final Mix
The lesson, today, was “Pre-Dubbing towards The Final Mix”, where we discussed about re-recording mixers, such as Gary Rizzo and Michael Semanick, and we went more in depth, debating about their roles.
-
The re-recording mixer, or Dubbing Mixer, comes in at the beginning of the post-production process for film and television and he or she is responsible for mixing the complete soundtrack, enhancing the audio for technical and aesthetic quality.
-
The Dubbing Mixer adds together the work of the sound effects editor, Foley artist, music editor, and dialogue editor into one cohesive sound product that seamlessly accompanies the images on the screen.
-
The soundtrack of a film has to follow the next three steps:
-
Creating/ Editing: Dialogue, Effects, Music
-
Mixing: Premix, then Final Mix
-
Playback: Screening
This is Michael Semanick,
Re-Recording Mixer Engineer
Language of Sound Imagery
A. Simile= acoustic similarity of two sounds (scream and siren)
B. Hyperbole= obvious and intentional exaggeration (scream with alarm clock)
C. Metaphor= suggest comparison between an actual sound with an idea (scream with blinking red light)
D. Irony= contrast of least expected opposites (scream with smile)
E. Vivification= give living traits in inanimate objects (scream from doormat)
The Sonic Vocabulary for Motion Picture
a. Rhythm- regular= stability, predictability vs. irregular=insecurity, confusion;
b. Intensity- quiet vs. loud impact, it is called the power of silence;
c. Timbre- tonal/order/harmony vs. noisy/confusion/dissonance;
d. Pitch- low vs. high Contrast= character development;
e. Speed- slow vs. fast; intense vs. relaxed; intelligibility vs. confusion contrast;
f. Shape- impulsive vs. reverberant; large vs. small; near vs. distant space; size & dimension;
g. Organization- order vs. chaos
-
Scene number
-
Takes
-
Content of channels
-
Comments
-
Timecode
The three listening Modes
Pre-Production for Production - Sound Reports & Notes
-
Causal Listening: the source of the sound
-
Semantic Listening: the impact of the sound within an environment/context
-
Reduced Listening: the quality of the sound (ex:pitch)
Notes I took from the "Sound Design" book, by David Sonneschein
The sound designer must develop its perceptive ability, meaning the two sides of creative intelligence: impression and expression.
Notational systems:
-
Chronological
-
Acoustic (reduced listening)
-
Perceptual (how brain interpret sound)
-
Musical
-
Phonetic (human speech)
-
Audiovisual
-
Emotional
-
Descriptiv
Sound energy transformation:
-
Physical
-
Emotional
-
Intellectual
-
Moral
The first script reading:
It’s the first “listening” you will have of your soundtrack. Make sure you firstly read the script instead of letting your eagerness to jump into the visuals spoil. It’s almost impossible to not being influenced by the impression that the visual will have made. So make sure you READ THE SCRIPT BEFORE WATCHING ANYTHING.
What to listen for...objects, actions, environments, emotions and transitions:
-
First reading: key words and ideas
-
Subsequent readings: track down everything in much greater detail, and write down the development and transformation of the sound throughout the story.
This is a category of techniques which helps in splitting the sound:
-
people, objects, actions that are already explicitly described
-
environments that can be fleshed out with ambiance sound
-
key words which give clues to the emotions
-
parts with physical or dramatic transition